Pictures of our progress:
(After playing around with the settings on my camera - using the "food" setting, I finally got a few that were closer to the true color which is a nice chocolate brown. Maybe the "food" setting worked because the color we chose was cocoa? or because it takes place in a kitchen?? Who knows.)
Before pictures:
(look behind the popcorn ceiling-dust-covered me and at the cabinets!)
For some reason the countertop goes all the way against the oven, while the cabinets do not. There is about a 3 inch gap on both sides between the cabinets and oven. Which the previous owners covered with a strip of lament. See how we fixed it below...
During:
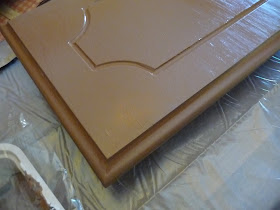
This is after the doors and cabinets had been cleaned and the "bond coat" (sort of like paint/primer) had been applied
More during:
The final step is to apply a clear top coat, which is also provided in the kit.
After (so far):
Sadly, my camera isn't able to properly capture the effect the "decorative glaze" has. It really makes a difference in person. I'll continue to play with the settings on my camera to see if I can get a better picture.
I am also in love the the hardware we chose, I'll show you a close up next time.
There is still a lot to do - Finish the rest of the cabinets, apply the hardware (we just bought a few to test them out) and do touch ups! I can't wait to finish so I can have my kitchen back and show you the final look!
one more before and after:


They turned out great! I love the new look. It really changes everything.
ReplyDeleteIt turned out great!! I actually am going to do them ourselves! Any advice?
ReplyDeleteThey look amazing!! We have these HORRENDOUS knotty oak cabinets and REALLY need to do something about them. Any tips or tricks you may want throw our way?
ReplyDeleteThe kit is really very good. It is practically all included and very easy to use.
ReplyDeleteMy biggest advice would be to take your time. This is probably not a weekend project. There are 4 steps (deglossing, applying the bond coat, glazing, and top coat) so it does take some drying time between each step.
Other than that, play with the glaze to achieve your desired look. It really makes the final product.
Also I would suggest splurging for high quality brushes and painters pyramids.
I'm glad you like the look! Thanks for the comments!
Great Transformation!!
ReplyDeleteMuch Better....
I am about to paint kitchen cabinets & this post was very helpful... Thanks for sharing..
Great job! I'm gearing up to do our cabinets, but mine will require adding trim to each cabinet door. Kinda dreading it, but when I see what a difference it makes (like in your kitchen) I can't help but get a little excited too.
ReplyDeleteStopping by from TDC - you have been busy and it has really paid off! Looks great!
ReplyDeleteWow that is truly amazing! Thank you for stopping by to share this. I really am anxious to get started but know I have to wait until the Fall. It looks so smooth. Do you see brush strokes or is it self leveling?
ReplyDeleteThanks again for sharing this.
Stephanie at Full of Great Ideas.
It does look alot better! Thank you for NOT painting them white like everybody else in blogland! :)
ReplyDeleteLooks great!!! I love the transformation! I am visiting from Tatertots and Jello and I am a new follower! I would love love love if you would link this up to my Delicately Constructed linky party!
ReplyDeleteI hope you have a fabulous weekend and I see you around soon!
Michelle
www.delicateconstruction.blogspot.com
Lovely transformation! As someone who painted her kitchen cabinets, I know how hard it can be, but so worth it:)!
ReplyDeleteBeth
The cabinets look amazing. I plan to use this to do my parents' cabinets. Can't wait to try it.
ReplyDeleteRuth
Hmmm, the kitchen cabinets, after the application, look splendid! And it seems to work better than using ordinary varnish and paint. To add to that, the way you guys have done it looks professional!
ReplyDeletePretty amazing renovation. I am impressed this is one of the most simplistic yet effective kitchen redos I have seen in a while.
ReplyDeleteKatherine, your cabinets are looking good. I'd love to paint mine, but can't convince my hubby. :)
ReplyDeleteI got my toolbox at Lowe's for $17.