Saturday, July 31, 2010

It's time to try defying gravity

One of the first rooms we worked on in our new house was Todd's study. I am always having trouble finding the perfect (or any) piece of art for the walls. Todd's study was no different. We had a few things to put on the walls, but also needed much more storage space for all of his books. I thought that those invisible floating book shelves [as seen here] would be the perfect solution. I have always been sort of fascinated with them, but at $15 a pop, I thought - surely I can make something similar on the cheap because I'm so crafty.

Turns out, I'm not the only one who had this thought. Although I did think of this and the use of materials on my own, I was happy to see others had been able to make these! I found this video somewhat helpful, and also somewhat stupid. I also made a few modifications to their technique.

The first thing you do is gather a few sacrificial books. These are books that you don't care about cutting up (sacrilege, I know), but they must also be books that you won't mind having on your shelf. These books must also be pretty big. You also don't want to put scrawny or wimpy books. These will be the foundation for stacking your other awesome books.

In addition to your sacrificial books, you will need some L brackets. I used 5" L brackets. You will also need a box cutter, short screws with a flat head, some glue, some heavy books, and some longer screws to secure your shelf to the wall. 

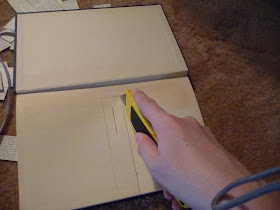
step 1: Open the back flap of the book, measure and mark the middle. From the middle trace the outline of your L bracket


Step 2: Using your box knife, cut out the outline you just made. You're cutting a groove to put you L bracket in. I found it helpful to cut it a little deeper so that your bracket is recessed within the book.


Step 3: Cut a notch in the front cover of the book for the L bracket to fit in. This way, the cover will close flush with the bracket.


Step 4: Secure your bracket to the book using the short screws. These don't have to go all the way through the book, just enough to secure the bracket in place.
Step 5: Next, you secure the back pages with the short screws.

Note: this part is sort of tricky. The pages keep trying to push up against the screw and you have to push it down really hard. If you have weak arms/wrists that your family makes fun of you for - it might be easier to get your hunky husband to do this part.


Step 6: Finally, glue the back flap closed. The video suggested Elmers glue, but turns out we don't have any glue. I did find some spray adhesive from our headboard project and decided to give it a try. It worked just great! To make sure it really sticks, stack some heavy books on top to smoosh it down.


Once the glue is dry, you can attach the book/bracket to the wall, and think about how smart and crafty you are!


Lastly, stack your favorite books up,


Lastly, stack your favorite books up and admire your work!
Enhanced by Zemanta

Thursday, July 22, 2010

I don't think you're ready for this jelly

Sorry about the title of this post. It was either that or "going plum crazy!" I thought the Beyonce reference was more adventurous.

Tuesday I got together with my wonderful Mimi and made jelly. Plum jelly to be exact. Red plum jelly to be exact-er.

It was really fun! I had seen a post one someone's blog a couple of weeks ago about making strawberry jelly, and had thought at the time that it would be fun to try making jelly sometime. About a week after I read that post, my grandmother (Mimi) asked if I'd like to try making some plum jelly with her.

It turned out to be quite simple and fun!

First, gather your supplies


To make the jelly, you will need:
Fruit. We used Red Plums, but you can use just about any fruit
a lot of sugar (about 6.5 cups!)
water
3 layers of cheesecloth
Pectin: we used Certo Jelly Pectin (this is the stuff that turns your sugar/fruit juice combination into actual jelly) ours was a thick liquid that came in a pouch, but the traditional pectin is powered. Either would do.
and a large heavy pot.

Once the jelly is made you will want to put it in jars, and seal them for freshness.


The making of the jelly:
The first thing you do is wash and chop up your fruit. Make sure you have the recommended weight of cut fruit. We needed 4 pounds of chopped fruit

My sweet Mimi chopping up the plums!


Once you have measured your fruit to the exact amount needed, put it in your large, heavy pot.

Then you add the appropriate amount of water to your pot O' fruit. For ours it was 1 Cup (the pectin has directions which tells you how much you need for your specific fruit)

Next, you bring your fruit and water mixture to a boil. Then cover and simmer for 10 minutes (tip! simmer longer!)

After you simmer your fruit and water comes the gross hard part. Straining the boiled fruit. Put your 3 layers of cheesecloth over a bowl and pour boiled fruit/water/mixture into the center of the cheesecloth. You are supposed to tie up the cheesecloth and let the fruit juices drip until they stop dripping. We shortly realized you don't really have to wait till the juices stop flowing, just until you have enough juice. We needed 4 cups, which came out very quickly thanks to our extra simmer time.


Once you have your juice measured to the exact amount needed (for us, 4 cups), Put it back in your pot.

The next step is to add the sugar. Our plum jelly called for 6.5 cups of sugar. Add your sugar to the pot and let it dissolve, bring the sugar/juice mixture to a boil, making sure to stir the whole time. Our recipe called for the mixture to be at rolling boil. Which means that the bubbles don't stop when you stir it. (you experienced people out there probably already know that, but I didn't!)


Once the sugar/juice mixture is at a rolling boil, add the pectin and boil for 1 minute. Tip: They lie! Boil it longer! Our second batch we boiled for a about 3 minutes and it set up much nicer.

Once you've boiled it, ladle it into the jars and seal it!


wipe off the rim.

and seal it nice and tight.


If your jelly doesn't set up right away, do not fear! The package said it would need at least 24 hours. I also read that it is not uncommon for it to take up to 2 weeks or even a month to set up. Our second batch was ready later that day and the first batch is almost set up. If it never sets up, there are still ways to fix it!

Thanks Mimi! I had a wonderful time!


Enhanced by Zemanta

Tuesday, July 20, 2010

Pool!!

Right before we left on our trip to Texas, a very important (to me) package came to our home. It was our POOL! When we first moved in, our previous owners left their kid's playground in our backyard. So I put it up on craigslist! Someone paid us to take it down and haul it away (that's right. paid us!) So with the extra money and space we (I) decided that we should get a pool! We wanted a small one that was just big enough to float in and cool off.

I was so happy that our pool came in, but with leaving the next day, we decided to wait till we got back to put it up. Then when we got back it rained, and rained, and rained FOREVER! Once it finally stopped raining, we put the pool up, and I've been enjoying it ever since!

I use it for an hour or two each day. I'm even getting a little bit of a tan (not that anyone could tell! I still look pasty!)


It is twelve feet in diameter and 36" deep

We also got a solar cover for it which works surprisingly well. The older I get, the less tolerant of freezing water I am. I could have joined the polar bear club when I was little, but no more!

Here is a pic of me floating!


Enhanced by Zemanta

Saturday, July 17, 2010

happy birthday Todd!

Happy birthday to my wonderful husband who hates birthdays. (well his birthday, all others are ok, I guess)


birthday card I would have gotten you #1


Birthday card I would have gotten you #2


Birthday card I would have gotten you #3

Well, this one is really sappy, and talks about how much I love you. And how I'm glad you were born so when we grew up, I could love you. But I won't post that here, don't worry.

Monday, July 12, 2010

Adventures in travel!


Last week (can I still say last week when it's almost two weeks ago?) Todd and I traveled to Texas for his Grandma June's 80th birthday celebration/Forsythe reunion. The celebration was a great success! It is so nice to see everyone get together! Here is a picture of the whole gang.


After the reunion, Todd and I continued south to Galveston for a couple of days. This was my first trip to Galveston and my first time to swim in the Gulf of Mexico! Don't worry, there were no tar balls to be found. One man we met did say that many of the BP ships were coming into Galveston to be serviced and would drag along a little bit of oil with their boats. But none from the spill itself.

It rained a lot while we were there but we did manage to swim in the ocean both days. I was amazed at how warm the water was. I have always heard that it is warm, but the only ocean swimming experience I've had was in Carmel and Cancun - and in both, the ocean can be quite chilly, so I wasn't counting on it actually being WARM. The water temperature both days was around 87 degrees, even after the rain!

We mostly slept in, swam in the ocean, looked at all the little shops on The Strand, went to the aquarium, and played a lot of mini golf!

Here are some pictures:

All the cute little shops on the Strand.
I got a new summer bag and some cute beaded sandals which I LOVE.


The Moody Gardens. we were not that impressed overall - but we did really enjoy their aquarium.


Todd and I in the shark cage


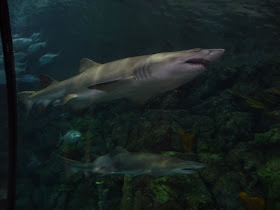
some of their many sharks!


Todd in his vacation hat! Probably telling me not to take a picture of him.


About to play some mini golf!


I started to take pictures next to each hole-in-one.
But I'm too awesome at putt-putt and it started getting ridiculous.


Somehow I only got one beach picture.
This is the beach outside out hotel. But we mostly swam at the public beaches.


Overall, we had a very nice trip!

Enhanced by Zemanta